## What is Istio?
[Istio](https://istio.io/?ref=devopscube.com) is a popular [Service Mesh](https://devopscube.com/service-mesh-tools/), an infrastructure layer that manages communication between microservices in a Kubernetes cluster. It is used in production by companies like Airbnb, Intuit, eBay, Salesforce, etc.
Everyone starting with Istio will have the following question.
_Why do we need Istio when Kubernetes offers many microservices functionalities?_
Well, when you have dozens or hundreds of microservices talking to each other, you face **challenges that Kubernetes cant handle.**
Here are some of those features Kubernetes doesnt offer natively.
1. Load balancing between service versions.
2. Implementing Circuit breaking and retry patterns.
3. Enabling automatic Mutual [TLS](https://devopscube.com/configure-ingress-tls-kubernetes/) (mTLS) between all services.
4. Automatic metrics collection for all service-to-service calls
5. Distributed tracing to follow requests across services and more..
Without ISTIO, you will have to build these features into every microservice yourself. But Istio provides them at the infrastructure level using **sidecar proxies** (Envoy) that intercept all network traffic without changing your application code.
📌
Explaining all Istio concepts is beyond the scope of this guide. Here, we will focus on setting up Istio on kubernetes, getting it up and running, and validating the setup using sample applications.
Now that you have a high level idea of Istio service mesh, lets get started with the setup.
## Setup Prerequisites
To set up Istio, you need the following.
1. A [kubernetes cluster](https://devopscube.com/setup-kubernetes-cluster-kubeadm/)
2. [Kubectl](https://devopscube.com/kubectl-set-context/) [Local workstation]
3. [Helm](https://devopscube.com/create-helm-chart/) [Local workstation]
Lets get started with the setup.
## Kubernetes Node Requirements
To have a basic Istio setup up and running, you need to have the following minimum CPU and memory resources on your worker node.
- 4 vCPU
- 16 GB RAM
It will be enough for Istio control plane + sidecars + a few sample apps to get started.
⚠️
If you enable ****telemetry / logging / tracing**** (Prometheus, Grafana, Jaeger/Kiali), memory/CPU overhead will increase.
## Istio Sidecar Vs Ambient Mode
Before you start setting up Istio, you should know the following two Istio deployment modes.
### 1. Sidecar Mode
In this mode, Istio Deploys an Envoy proxy as a sidecar container alongside each application pod. All the traffic flows through this sidecar proxy (data plane component) and **provides all the L4-L7 features** directly within the pod for all inbound and outbound connections.
[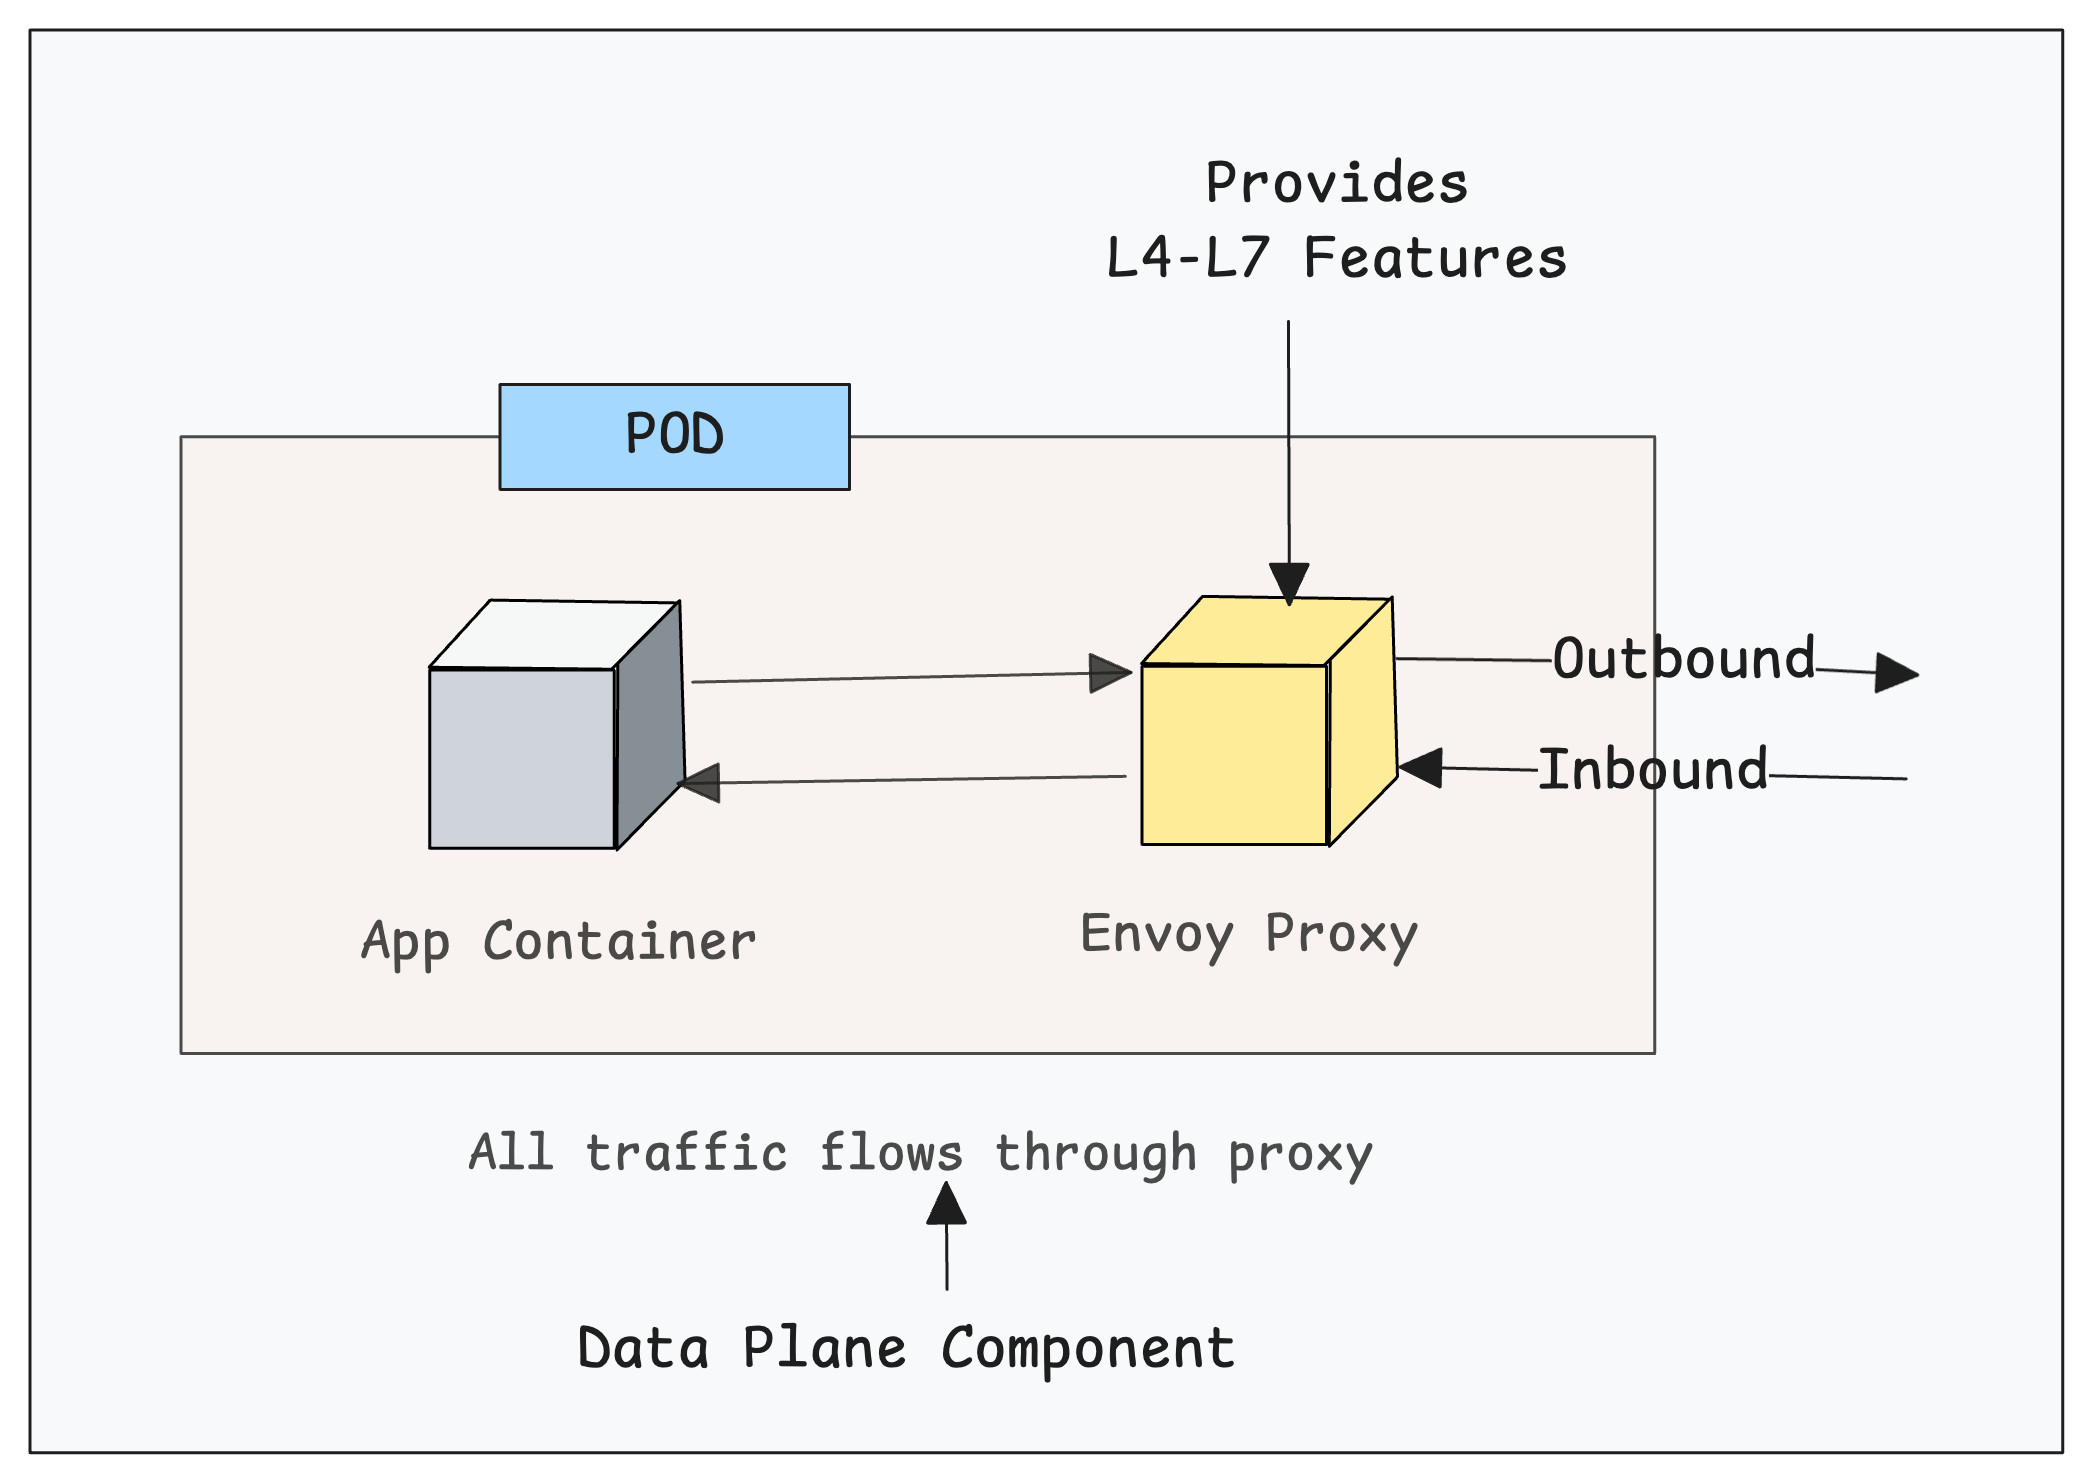](https://devopscube.com/content/images/2025/11/image-90.png)
It also means, each pod requires additional CPU and memory (typically 100-500MB RAM) for the sidecar container.
### 2. Ambient Mode
In this mode, no sidecars are injected into application pods.
Istio deploys a node-level proxy called [ztunnel](https://github.com/istio/ztunnel?ref=devopscube.com) as a [DaemonSet](https://devopscube.com/kubernetes-daemonset/) for L4 functionality (mTLS, authN/authZ at transport layer). This means, all pods on a node share the same ztunnel instance instead of their own sidecar proxies.
If you want L7 features (HTTP, gRPC, etc) you can run an optional namespace-scoped proxies.
[](https://devopscube.com/content/images/2025/11/image-91.png)
To put is simple, ambient mode is more “evolved” in concept but it is still newer. Meaning there are more trade-offs and some gaps
⚠️
In this guide we are ****focussing on the Istio Sidecar Mode**** mode because ambient mode still has a few limitations and relative immaturity compared to the sidecar model
## Install Istio Using Helm
Helm is the common method followed in organizations to istall and mangage Istio. We will be using Helm to install Istio on the [Kubernetes cluster](https://devopscube.com/production-ready-kubernetes-cluster/).
Follow the steps given below for the installation.
### Step 1: Add Helm Chart Repo
First, we need to add and update the official Istio Helm repo on our local machine.
```bash
helm repo add istio https://istio-release.storage.googleapis.com/charts
helm repo update
```
Now, we have added the Istio repo. So we can list the available charts of this repo.
```bash
helm search repo istio
```
In the output, we can see all the Istio related chart lists and their latest versions. We will not be using all the charts.
```bash
$ helm search repo istio
NAME CHART VERSION APP VERSION DESCRIPTION
istio/istiod 1.28.0 1.28.0 Helm chart for istio control plane
istio/istiod-remote 1.23.6 1.23.6 Helm chart for a remote cluster using an extern...
istio/ambient 1.28.0 1.28.0 Helm umbrella chart for ambient
istio/base 1.28.0 1.28.0 Helm chart for deploying Istio cluster resource...
istio/cni 1.28.0 1.28.0 Helm chart for istio-cni components
istio/gateway 1.28.0 1.28.0 Helm chart for deploying Istio gateways
istio/ztunnel 1.28.0 1.28.0 Helm chart for istio ztunnel components
```
We will be using only those are required for sidecar mode implementation.
### Step 2: Install Istio CRD's
Istio adds many custom features to Kubernetes like traffic routing, mTLS, gateways, sidecar rules, policies, and more.
These Istio features do not exist in Kubernetes by default. To support them, Istio defines them as Custom Resource Definitions (CRDs)
We can install the CRD's from the Istio chart list. We need to choose the `istio/base` chart to setup Istio in sidecar mode.
Execute the following command to install istio-base.
```bash
helm install istio-base istio/base -n istio-system --set defaultRevision=default --create-namespace
```
You should get a successful message as follows.
```bash
NAME: istio-base
LAST DEPLOYED: Sat Nov 15 14:58:26 2025
NAMESPACE: istio-system
STATUS: deployed
REVISION: 1
TEST SUITE: None
NOTES:
Istio base successfully installed!
```
Once the CRD deployment is completed, the Kubernetes API server supports Istio resource types.
We can list the Istio CRDs using the following command.
```bash
kubectl get crds | grep istio
```
You will get the following output. It contains CRD's realted to security, traffic management, telemetry, extensions and workloads.
```bash
$ kubectl get crds | grep istio
authorizationpolicies.security.istio.io 2025-11-15T06:20:10Z
destinationrules.networking.istio.io 2025-11-15T06:20:10Z
envoyfilters.networking.istio.io 2025-11-15T06:20:10Z
gateways.networking.istio.io 2025-11-15T06:20:10Z
peerauthentications.security.istio.io 2025-11-15T06:20:10Z
proxyconfigs.networking.istio.io 2025-11-15T06:20:10Z
requestauthentications.security.istio.io 2025-11-15T06:20:10Z
serviceentries.networking.istio.io 2025-11-15T06:20:10Z
sidecars.networking.istio.io 2025-11-15T06:20:10Z
telemetries.telemetry.istio.io 2025-11-15T06:20:10Z
virtualservices.networking.istio.io 2025-11-15T06:20:10Z
wasmplugins.extensions.istio.io 2025-11-15T06:20:10Z
workloadentries.networking.istio.io 2025-11-15T06:20:10Z
workloadgroups.networking.istio.io 2025-11-15T06:20:10Z
```
### Customizing Istio Chart & Values (Optional)
In **enterprise environments**, you cannot install Istio directly from the public Helm repo.
You will have to host the helm chart in internal helm repos (e.g., Nexus, Artifactory, Harbor, S3 bucket, Git repo). Also you will customization to the default values to meet the project requirements.
In that case, you can download the chart locally or store it on your own repo, use the following command.
```bash
helm pull istio/base --version 1.28.0 --untar
```
Once you pull the chart, the directory structure looks like this.
```bash
base
|-- Chart.yaml
|-- README.md
|-- files
| |-- crd-all.gen.yaml
| |-- profile-ambient.yaml
| |-- ...
| |-- ...
| |-- ...
| |-- profile-remote.yaml
| `-- profile-stable.yaml
|-- templates
| |-- NOTES.txt
| |-- crds.yaml
| |-- defaultrevision-validatingadmissionpolicy.yaml
| |-- defaultrevision-validatingwebhookconfiguration.yaml
| |-- reader-serviceaccount.yaml
| `-- zzz_profile.yaml
`-- values.yaml
```
Here, you can see the `values.yaml` file, which has the modifiable parameters.
So if you want to do a custom installation, you can modify this file or create a new values file with only the required parameters.
Then run the following command to install the CRDs using the downloaded chart.
```bash
helm install istio-base ./base -n istio-system --create-namespace
```
💡
To use the custom values file, during the Helm installation command, use the `-f` field with the path of the custom file.
### Step 3: Install Istio Daemon (Istiod)
Istiod is the **Istio control plane** that manages everything related to Istio, like managing configuration,mTLS, service discovery, certification management etc.
Now, install the Istiod using the [Helm chart](https://devopscube.com/create-helm-chart/). For that, we need to select the `istio/istiod` chart from the list.
```bash
helm install istiod istio/istiod -n istio-system --wait
```
Wait a few seconds to complete the installation.
This will install the Istiod control plane as a deployment and other required objects like services, configmaps, secrets, etc.
### Customizing Istio Daemon Chart & Values (Optional)
For a custom installation, pull the charts to local, create a custom values file, or modify the default `values.yaml` file, then install the charts downloaded locally.
Use the following command to download the chart locally.
```bash
helm pull istio/istiod --version 1.28.0 --untar
```
The following is the structure of the chart.
```bash
istiod
|-- Chart.yaml
|-- README.md
|-- files
| |-- gateway-injection-template.yaml
| |-- grpc-agent.yaml
| |-- grpc-simple.yaml
| |-- ...
| |-- ...
| |-- ...
| |-- profile-preview.yaml
| |-- profile-remote.yaml
| |-- profile-stable.yaml
| `-- waypoint.yaml
|-- templates
| |-- NOTES.txt
| |-- _helpers.tpl
| |-- autoscale.yaml
| |-- ...
| |-- ...
| |-- ...
| |-- validatingwebhookconfiguration.yaml
| |-- zzy_descope_legacy.yaml
| `-- zzz_profile.yaml
`-- values.yaml
```
This is how the Istiod Helm chart is structured, and the following are the images used on this chart.
- `busybox:1.28`
- `docker.io/istio/pilot:1.28.0`
💡
In ****project envionments****, you will have to ****host these images in internal private registries**** and use that image urls in the helm chart.
Then run the following command to install Istiod using the downloaded chart.
```
helm install istiod ./istiod -n istio-system --wait
```
💡
By default, Istiod is deployed with Horizontal Pod Autoscaler, so when the Pod's CPU threshold reaches 80%, the replication will be increased.
The default max replication is 5.
## Validating Istio Installation
Run the following command to list the pod, deployment, and service created by the Helm chart.
```bash
kubectl -n istio-system get po,deploy,svc
```
You will see the following objects.
```bash
$ kubectl -n istio-system get po,deploy,svc
NAME READY STATUS RESTARTS AGE
pod/istiod-fd9bbfdf8-wd5sw 1/1 Running 0 5m20s
NAME READY UP-TO-DATE AVAILABLE AGE
deployment.apps/istiod 1/1 1 0 5m20s
NAME TYPE CLUSTER-IP EXTERNAL-IP PORT(S) AGE
service/istiod ClusterIP 10.102.128.197 <none> 15010/TCP,15012/TCP,443/TCP,15014/TCP 5m20s
```
The output ensures that the installation is successful without any issues.
## Install Istioctl [Local Machine]
**`Istioctl`** is a command-line tool to access and manage the Istio Daemon from the local machine.
Use the following command to install Istioctl.
For Linux:
```bash
curl -sL https://istio.io/downloadIstioctl | sh -
export PATH=$HOME/.istioctl/bin:$PATH
echo 'export PATH=$HOME/.istioctl/bin:$PATH' >> ~/.bashrc
source ~/.bashrc
```
For MAC:
```bash
brew install istioctl
```
For other installation options, you can use this [official documentation](https://istio.io/latest/docs/ops/diagnostic-tools/istioctl/?ref=devopscube.com) for the installation.
Verify the installtion using the following command. It will shows the Istio clinent and control plane version.
```bash
$ istioctl version
client version: 1.28.0
control plane version: 1.28.0
data plane version: none
```
Now, we need to test Istio with applications.
## Quick Istio Demo: Deploy Apps, Inject Sidecars, and Split Traffic
Now that we have completed the installation, let's validate the setup using a sample deployment that uses Istio features.
Here is what we are going to do.
- Create a namespace and label it for automatic Istio sidecar injection.
- Then deploy two sample applications versions (V1 & V2) in the istio enabled namespace.
- Configure Destination rule & Virtual Service to split traffic between two versions of app using weighted routing.
- Then test the setup by creating a client pod and sends requests to the application service endpoint.
The following image shows what we are going to build in this test setup.
[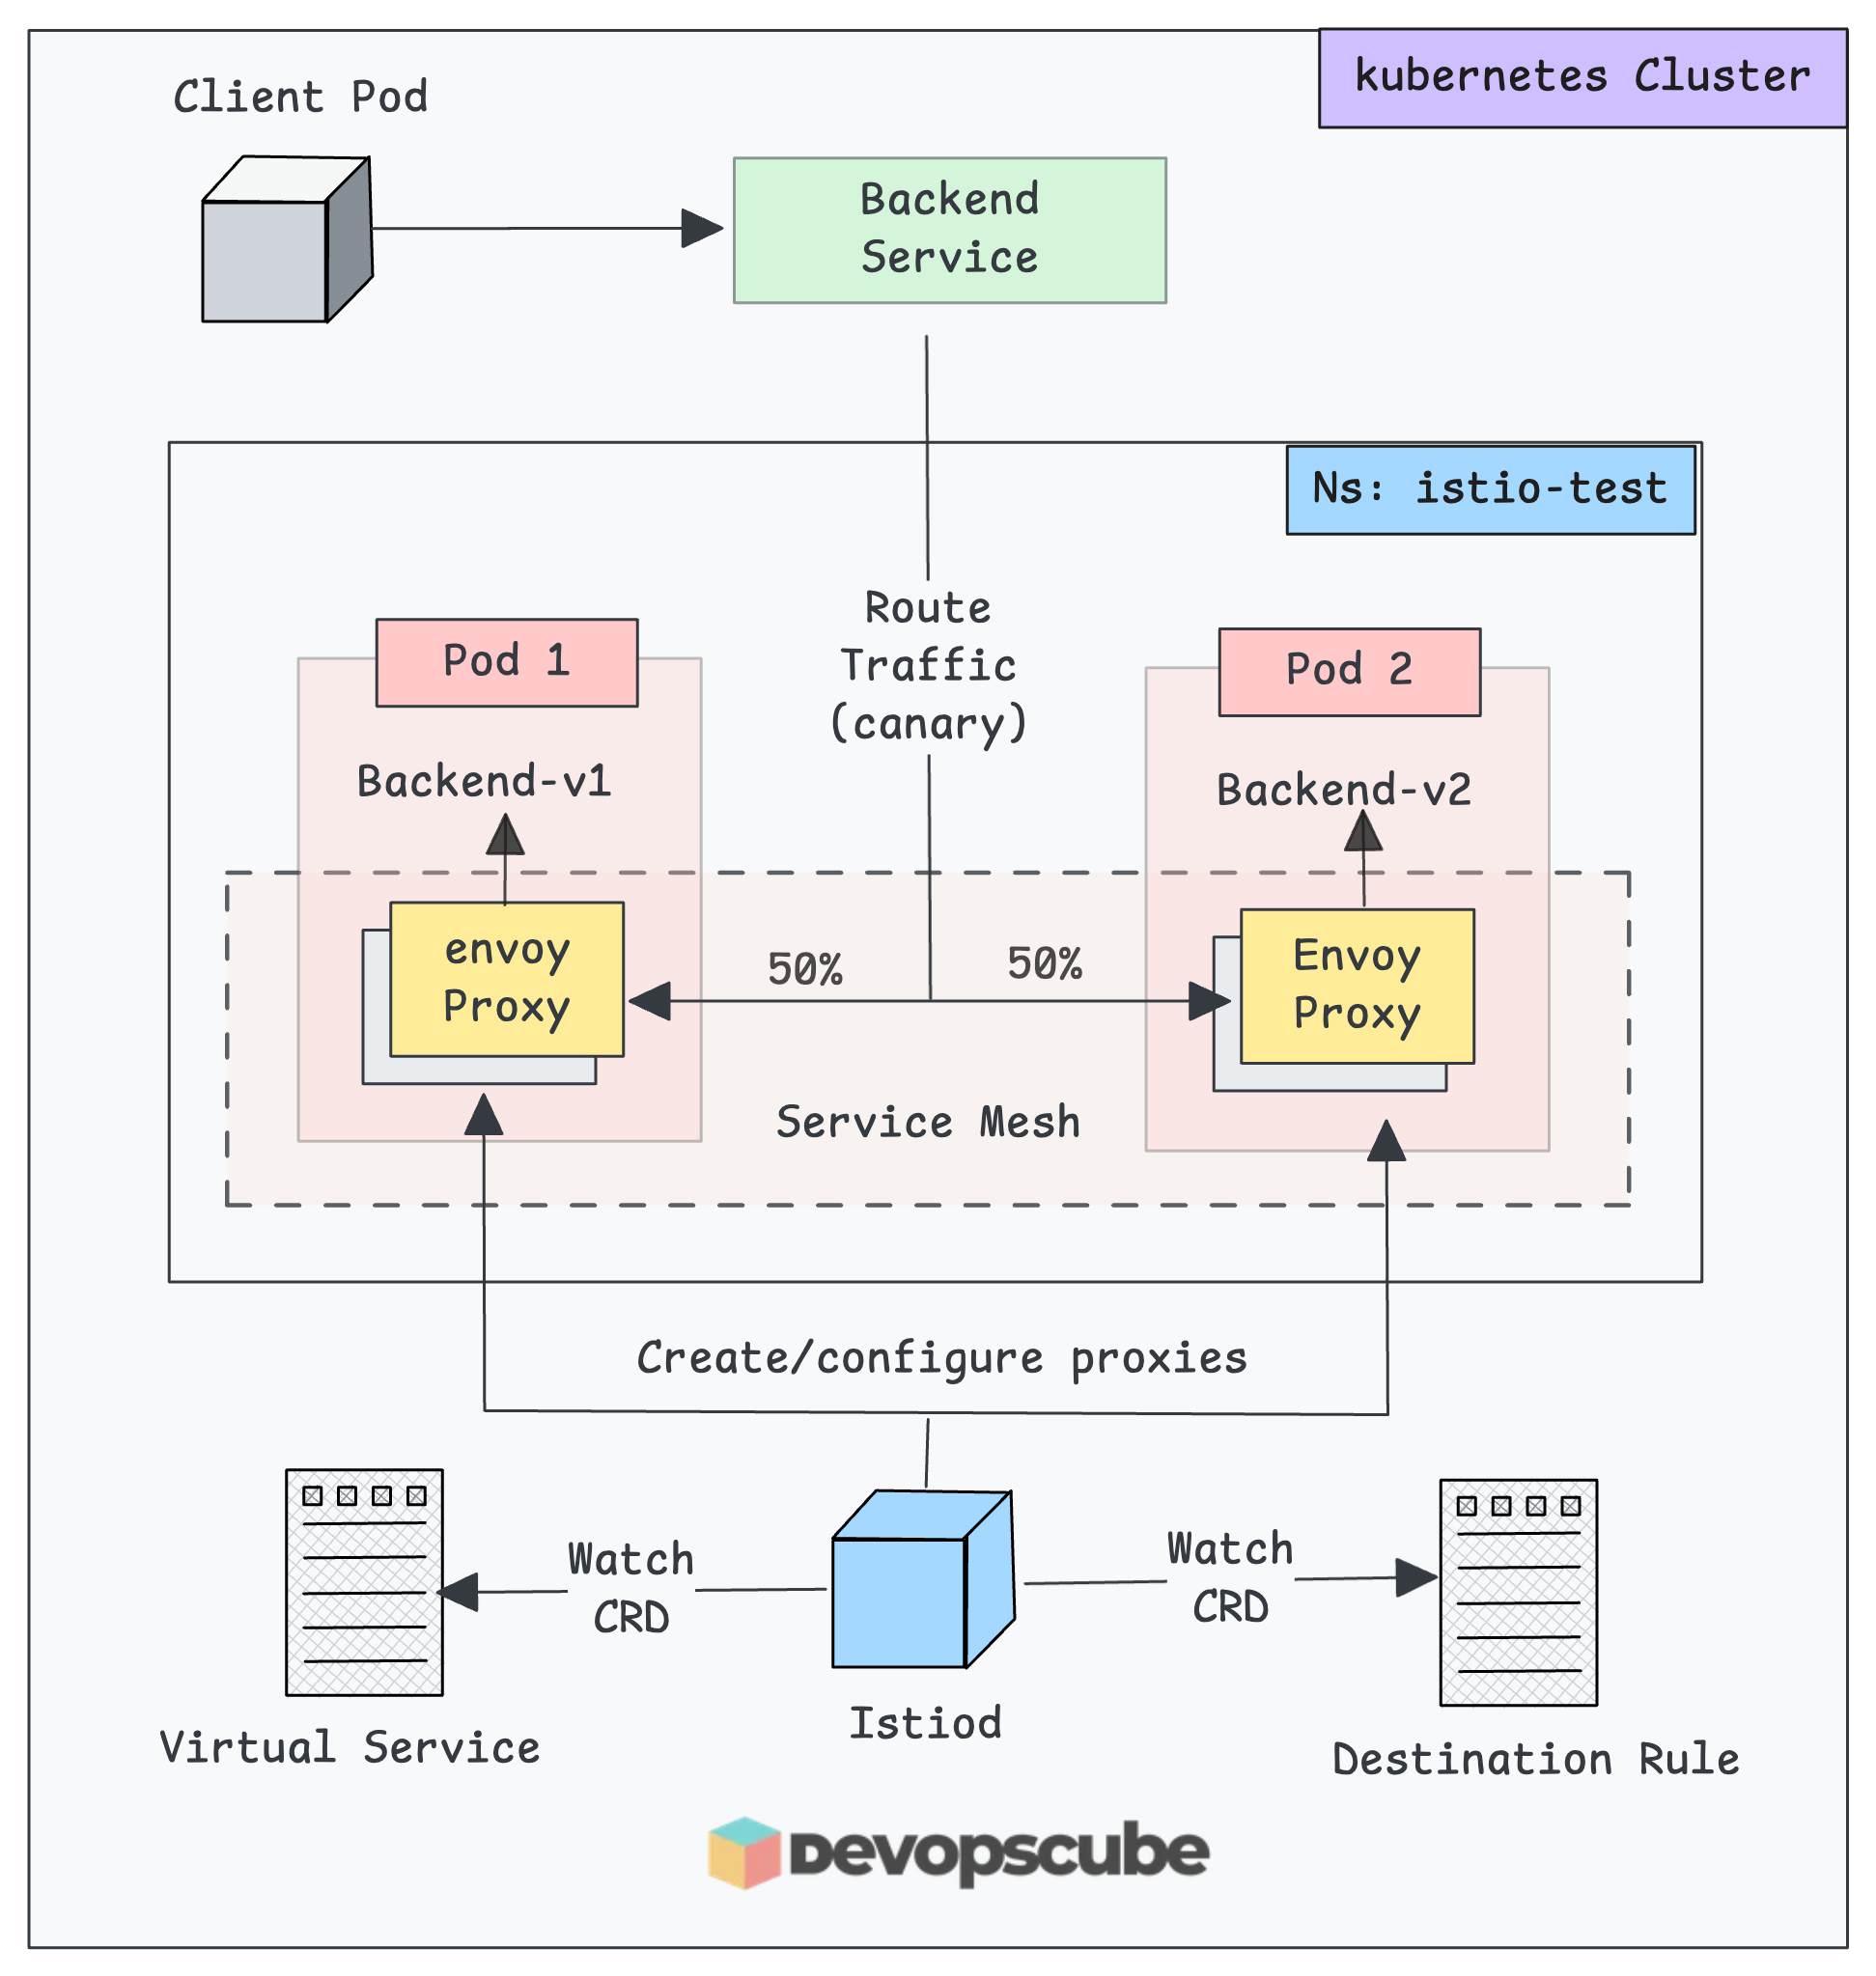](https://devopscube.com/content/images/2025/11/image-89.png)
Application deployment on Istio mesh to perform canary routing
Let's get started with the setup.
### Create a Namespace & Label
For testing, we use a dedicated namespace
```bash
kubectl create ns istio-test
```
Now we need to add the istio specific lable to enable automatic Istio sidecar injection.
```bash
kubectl label namespace istio-test istio-injection=enabled
```
When you set `istio-injection=enabled` on a namespace, Istio's **`MutatingAdmissionWebhook`** automatically injects an Envoy proxy sidecar container into any new pods deployed in that namespace.
Verify the label.
```bash
$ kubectl get namespace istio-test --show-labels
NAME STATUS AGE LABELS
istio-test Active 4m2s istio-injection=enabled,kubernetes.io/metadata.name=istio-test
```
⚠️
If you add the `istio-injection=enabled` label to an existing namespace with pods, you will need to restart the pods for the sidecar injection to happen.
### Deploy Two Sample Apps
For our validation, we are deploying two demo **http echo** applications and then test the traffic routing.
You can directly copy and paste the following manifests on your terminal to deploy the apps.
```yaml
cat <<'EOF' | kubectl apply -f -
apiVersion: apps/v1
kind: Deployment
metadata:
name: backend-v1
namespace: istio-test
spec:
replicas: 1
selector:
matchLabels: { app: backend, version: v1 }
template:
metadata:
labels: { app: backend, version: v1 }
spec:
containers:
- name: echo
image: hashicorp/http-echo:0.2.3
args: ["-text=hello from backend v1"]
ports:
- containerPort: 5678
---
apiVersion: apps/v1
kind: Deployment
metadata:
name: backend-v2
namespace: istio-test
spec:
replicas: 1
selector:
matchLabels: { app: backend, version: v2 }
template:
metadata:
labels: { app: backend, version: v2 }
spec:
containers:
- name: echo
image: hashicorp/http-echo:0.2.3
args: ["-text=hello from backend v2"]
ports:
- containerPort: 5678
---
apiVersion: v1
kind: Service
metadata:
name: backend
namespace: istio-test
spec:
selector:
app: backend
ports:
- name: http
port: 80
targetPort: 5678
EOF
```
Once you deploy the pod in the labelled namespace, **Istio will inject the proxy sidecar** on each pod.
Run the following command to check the status of the sample applications and backend **`svc`**.
```bash
kubectl -n istio-test get po,svc
```
You will get the following output.
```bash
$ kubectl -n istio-test get po,svc
NAME READY STATUS RESTARTS AGE
pod/backend-v1-6cf9fdbd56-99kzj 2/2 Running 0 20h
pod/backend-v2-776557dbfd-mzqnj 2/2 Running 0 20h
NAME TYPE CLUSTER-IP EXTERNAL-IP PORT(S) AGE
service/backend ClusterIP 10.100.87.2 <none> 80/TCP 20h
```
If you notice, the output says 2/2 ready. It is the application pod + the sidecar proxy.
To verify this, describe any of the pods from the namespace, and you will see the sidecar container.
```bash
kubectl -n istio-test describe po <pod-name>
```
You can see the main container and Istios container added as a sidecar as shown below.
[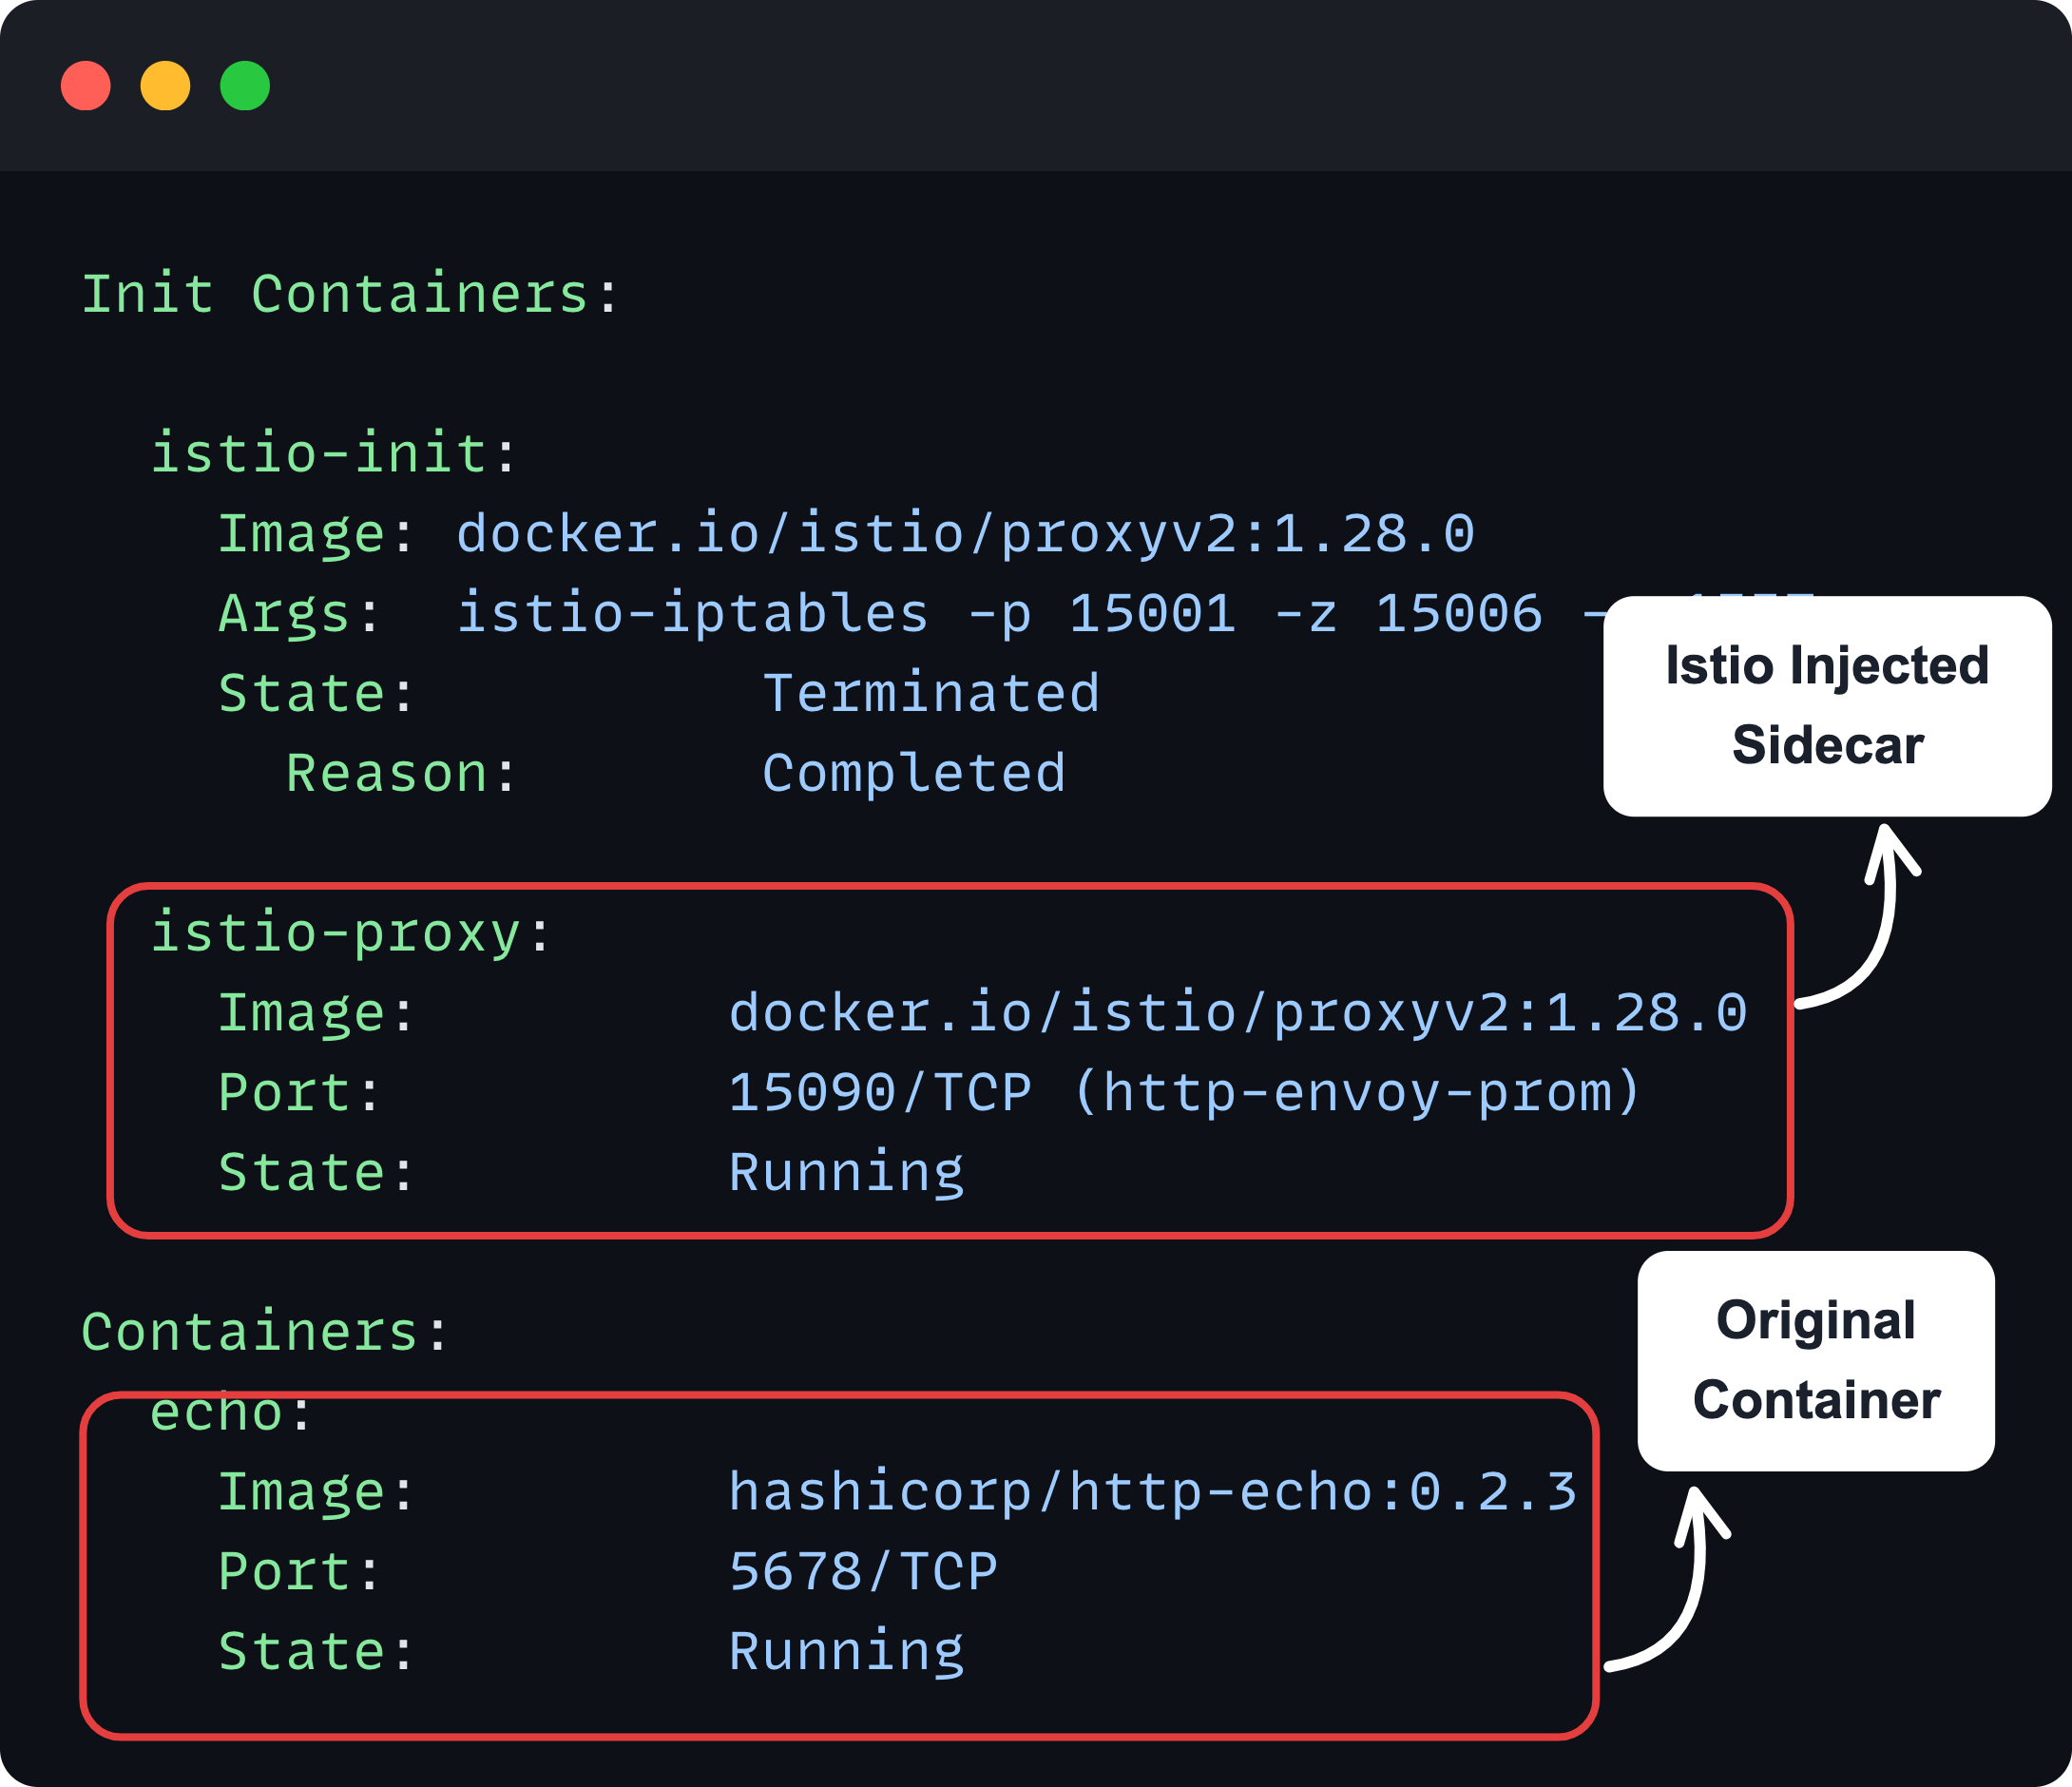](https://devopscube.com/content/images/2025/11/image-88.png)
Also, you can use `istioctl` to check the status of the proxies using the following command.
```bash
istioctl -n istio-test proxy-status
```
And, you will get the following output.
```bash
$ istioctl -n istio-test proxy-status
NAME CLUSTER ISTIOD VERSION SUBSCRIBED TYPES
backend-v1-6cf9fdbd56-99lkf.istio-test Kubernetes istiod-5d5696f494-pzqxs 1.28.0 4 (CDS,LDS,EDS,RDS)
backend-v2-776557dbfd-www9b.istio-test Kubernetes istiod-5d5696f494-pzqxs 1.28.0 4 (CDS,LDS,EDS,RDS)
```
In the output, we can see two Envoy proxies, which are connected with the Istio daemon (Control Plane).
Each side-car Envoy proxy is subscribed to specific discovery feeds via **gRPC or streaming connection** to the Istio control plane to decide how the traffic should be routed.
1. **LDS (Listener Discovery Service)** - This tells the Envoy to which IP and Ports to listen, and what to do when the traffic arrives.
2. **RDS (Route Discovery Service)** - After traffic is received, it tells Envoy where it should be sent.
3. **CDS (Cluster Discovery Service)** - Defines the services on other clusters and how to connect them.
4. **EDS (Endpoint Discovery Service)** - List the Pod IPs and Ports inside each cluster so Envoy can reach the correct destination.
This means **at runtime, Envoy is receiving updates** for what listeners to use, what routes to send traffic on.
Now, our demo deployments are ready, so we can now create the Destination Rule.
### Create a Destination Rule
As the name indicates, destination rule basically defines the rules on how the traffic should be handled at the destination (pod).
When we say rules, it means,
- Load balancing method
- Connection limits
- Circuit breaking
- TLS settings
- Retry policies and more..
For example, if you want to enable mTLS, or LEAST_REQUEST load balancing for the destination pod, you define all those in the **`DestinationRule`** CRD.
All the **`DestinationRule`** **configurations get translated into Envoy proxy** (pod sidecar) configuration.
💡
(istiod) pushes **`**DestinationRule**`** ****EVERY proxy in the mesh****, regardless of whether they'll ever call that service or not.
In our example, we are going to **perform a traffic split** between two versions of applications using **weighted routing**. It is also useful for canary routing.
For that we need to create a **`DestinationRule`**that creates two subsets.
- **Subset v1:** To group all pods with label **`version: v1`**
- **Subset v2:** Groups all pods with label **`version: v2`**
The following is the sample Destination rule configuration that creates two subsets.
```yaml
cat <<EOF > destination-rule.yaml
apiVersion: networking.istio.io/v1beta1
kind: DestinationRule
metadata:
name: backend
namespace: istio-test
spec:
host: backend.istio-test.svc.cluster.local
subsets:
- name: v1
labels: { version: v1 }
- name: v2
labels: { version: v2 }
EOF
```
To apply this, use the following command.
```bash
kubectl apply -f destination-rule.yaml
```
In the above config, we have used
- **`spec.host: backend.istio-test.svc.cluster.local`** - The domain name of the backend service that we created with demo application. It defines that the traffic should route to this backend service.
- **`subsets`** - Defines the versions of the backend services based on labels.
💡
Istio tells all Envoy proxies, "__When you see traffic going to__ `backend.istio-test.svc.cluster.local`, __apply these rules (subsets v1 and v2)__.
To list the Destination Rule Custom Resources, use the following command.
```
kubectl -n istio-test get destinationrules
```
You will get the following output.
```bash
$ kubectl -n istio-test get destinationrules
NAME HOST AGE
backend backend.istio-test.svc.cluster.local 6s
```
Now, we need to create a Virtual service.
### Create a Virtual Service
**Virtual Service** is a Custom Resource of the Istio, where we define where to route the traffic based on conditions such as host, path, weight, canary, etc.
So why do we need **`VirtualServic`e** when we already have **`DestinationRule`**?
Well, they serve completely different purposes in traffic management.
Think of it this way.
- **VirtualService** = WHAT traffic goes WHERE (Eg, path/host-matching, canary/weight, splits, header-based routing etc.)
- **DestinationRule** = HOW to handle traffic at the destination (connection policies)
Lets create a Virtual Service that does **weighted routing (canary style)** to the two subsets we deigned in the Destination rule.
To create a Virtual Service, use the following manifet.
```yaml
cat <<EOF > virtual-service.yaml
apiVersion: networking.istio.io/v1beta1
kind: VirtualService
metadata:
name: backend
namespace: istio-test
spec:
hosts:
- backend.istio-test.svc.cluster.local
http:
- route:
- destination:
host: backend.istio-test.svc.cluster.local
subset: v1
weight: 50
- destination:
host: backend.istio-test.svc.cluster.local
subset: v2
weight: 50
EOF
```
Here, we have defined the hostname of the service to route the traffic.
**`spec.http.route`** - This defines how to spread the traffic to the subsets. Here, we use the canary method, so the **50% traffic route to the v1** service and the **remaining 50% will be routed to the v2** service.
To apply this, use the following command.
```bash
kubectl apply -f virtual-service.yaml
```
To list the available virtual services, use the following command.
```bash
kubectl -n istio-test get virtualservices
```
You will get the following output.
```bash
$ kubectl -n istio-test get virtualservices
NAME GATEWAYS HOSTS AGE
backend ["backend.istio-test.svc.cluster.local"] 5s
```
Now, out setup is ready. Now we need to test the canary routing using a client Pod.
### Validate Traffic Routing With A Client
For validation, we are going to create a client pod to send a request to the sample applications.
To create a client pod, use the following manifest. We are deploying a curl image to send curl request.
```yaml
cat <<EOF | kubectl apply -f -
apiVersion: v1
kind: Pod
metadata:
name: sleep
namespace: istio-test
labels:
app: sleep
spec:
containers:
- name: curl
image: curlimages/curl:8.8.0
command:
- sh
- -c
- sleep 3650d
EOF
```
Wait until the pod gets ready.
The sidecar gets injected for this pod as well. Check the status of the proxies using `Istioctl` again.
```bash
istioctl -n istio-test proxy-status
```
You can see the new pod has also been added as a proxy in Istiod.
```bash
istioctl -n istio-test proxy-status
NAME CLUSTER ISTIOD VERSION SUBSCRIBED TYPES
backend-v1-6cf9fdbd56-99lkf.istio-test Kubernetes istiod-5d5696f494-pzqxs 1.28.0 4 (CDS,LDS,EDS,RDS)
backend-v2-776557dbfd-www9b.istio-test Kubernetes istiod-5d5696f494-pzqxs 1.28.0 4 (CDS,LDS,EDS,RDS)
sleep.istio-test Kubernetes istiod-5d5696f494-pzqxs 1.28.0 4 (CDS,LDS,EDS,RDS)
```
Now, lets make10 requests to the backend service from the client and see **how many times** the traffic **hits the v1 and v2** services.
```bash
for i in $(seq 1 10); do
kubectl exec -n istio-test -it sleep -- curl -s http://backend.istio-test.svc.cluster.local
echo
done
```
You can see that the requests are is split among each service.
```bash
$ for i in $(seq 1 10); do
kubectl exec -n istio-test -it sleep -- curl -s http://backend.istio-test.svc.cluster.local
echo
done
hello from backend v2
hello from backend v2
hello from backend v2
hello from backend v1
hello from backend v1
hello from backend v2
hello from backend v1
hello from backend v1
hello from backend v1
hello from backend v1
```
Thats it! You have deployed Istio and tested a sample app for canary routing.
## Exposing Applications Outside Cluster
The next step in the setup would be setting up a gateway to expose Istio enabled services outside the cluster.
The standard way to expose applications in Istio is using Ingress Gateways combined with a **VirtualService**.
The [Kubernetes Gateway API](https://devopscube.com/kubernetes-gateway-api/) will be the default API for traffic management in the future.
We will cover the entire setup in a separate blog.
## Cleanup
Once your setup is done and if you dont want the resources to be running, cleanup the resources so that you can save CPU and memory resources.
To delete the deployments and services of the application, use the following command.
```bash
kubectl -n istio-test delete deploy backend-v1 backend-v2
kubectl -n istio-test delete svc backend
kubectl -n istio-test delete po sleep
```
Now, we can delete the Namespace
```bash
kubectl delete ns istio-test
```
To remove the Istio Daemon, use the following Helm command.
```bash
helm -n istio-system uninstall istiod
```
To uninstall the Istio Custom Resource Definitions
```bash
helm -n istio-system uninstall istio-base
```
## Conclusion
When it comes to Istio setup in organizations, Helm is the preferred method for setting up Istio.
**Helm + GitOps** is a strong pattern for mature teams. This ways you get versioned installs, clear change history, rollback ability.
In this blog, we walked through installing Istio custom resources, the sidecar proxy (daemon), and using `istioctl` for setup and basic configuration. We also showed how to test the installation with a sample app.
There is more you can do with Istio, like routing rules, timeouts, mutual authentication, etc., and we will cover these topics one by one in the upcoming posts.